Close Menu
primehub.blog

    Subscribe to Updates

    Get the latest creative news from FooBar about art, design and business.

    What's Hot

    The Most-Saved Recipes in the Epicurious App in June

    June 27, 2026

    The Travel Hack That Saved Me Hours in Europe –

    June 27, 2026

    The Best Pool Vacuums – Tested by Bob Vila

    June 27, 2026
    Facebook X (Twitter) Instagram
    primehub.blog
    Trending
    • The Most-Saved Recipes in the Epicurious App in June
    • The Travel Hack That Saved Me Hours in Europe –
    • The Best Pool Vacuums – Tested by Bob Vila
    • Why Velux Fixed Skylights Are a Smart Choice for Any Property
    • How To Overcome The Guilt Of Not Taking Care Of Your Own Kids
    • How A Weekend At Omega Institute Restored Me (2026 Review)
    • The Strength Training Benefits No One Talks About
    • Summer Outfit Math | Cup of Jo
    • Home
    • Health
    • Finance
    • Lifestyle
    • Food
    • Travel
    • DIY
    • Eco Living
    • Tech
    primehub.blog
    Home » Programming the Oxocard Connect with CircuitPython
    DIY

    Programming the Oxocard Connect with CircuitPython

    PrimeHubBy PrimeHubSeptember 15, 2025No Comments3 Mins Read0 Views
    Share Facebook Twitter Pinterest LinkedIn Tumblr Email
    Programming the Oxocard Connect with CircuitPython
    Share
    Facebook Twitter LinkedIn Pinterest Email

    The next experiment is to add a button to the system. For this, we use the joystick button on the Oxocard Connect.

    Our goal is to toggle the LED on and off when the button is pressed. The button sends a digital signal to the GPIO pin. On the Oxocard, the signal is zero (or False) when the button is not pressed, and one (or True) when the button is pressed.

    The button has only two positions, but as shown below, we define four states:

    • Up: the button is not pressed.
    • Pressed: the button has just been pressed.
    • Down: the button is pressed.
    • Released: the button has just been released.
    Button states

    We are interested in the Pressed state, which is when the button was Up and is just now going Down. This is the moment when we want to toggle the LED.

    We could easily code this behavior ourselves, but CircuitPython provides a convenient way to handle buttons using the Adafruit Debouncer Library.

    The easiest way to install this library to your Oxocard connect is to download the library bundle from the CircuitPython website and use the Thonny IDE to copy the library files to the Oxocard Connect.

    1. Go to circuitpython.org/libraries and download the latest CircuitPython library bundle for your version of CircuitPython.

    2. Extract (unzip) the downloaded ZIP file.

    3. Open the Thonny IDE and connect to your Oxocard Connect.

    4. In the Thonny IDE, make sure the Files view (the folder icon on the left sidebar) is open.

    5. At the top of the Files view, in the “This computer” window, navigate to the folder where you extracted the library bundle, open the /lib folder, and search for the adafruit_debouncer.mpy file.

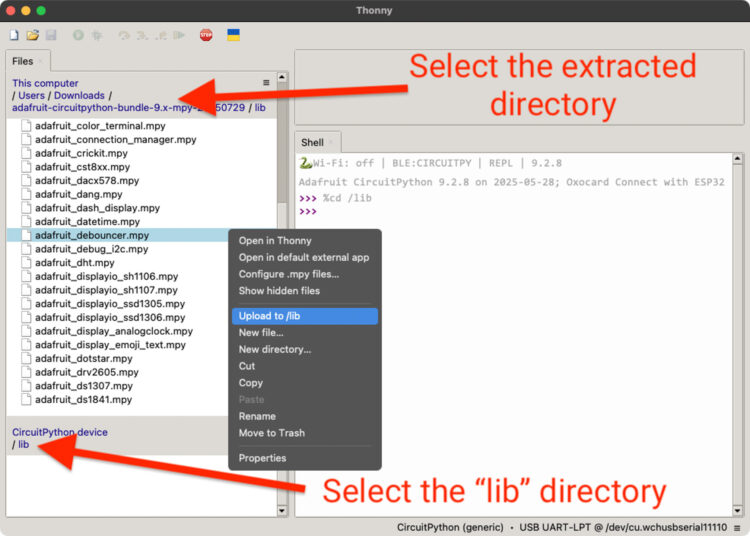
    6. In the bottom part of the Files view (“CircuitPython device” window), open the /lib folder.

    7. Left-click on the adafruit_debouncer.mpy file and choose Upload to /lib.

    8. The file should appear in the /lib folder on the CircuitPython device.

    9. Repeat the process for the adafruit_ticks.mpy library, which is a dependency of adafruit_debouncer.

    Now replace the content of the code.py file with the following code:

    1 # https://github.com/supcik/Oxocard-Connect-CP-Make-Src/blob/main/src/button.py
    2 # LED control with button press using CircuitPython
    3
    4 import board
    5 import digitalio
    6 from adafruit_debouncer import Button
    7
    8 LED_PIN = board.IO01
    9 BUTTON_PIN = board.BTN5 # The middle button
    10
    11
    12 def main():
    13     # Configure the LED
    14     led = digitalio.DigitalInOut(LED_PIN)
    15     led.switch_to_output(True)
    16
    17     # Configure the button
    18     btn = digitalio.DigitalInOut(BUTTON_PIN)
    19     btn.direction = digitalio.Direction.INPUT
    20     btn.pull = None # The Oxocard already provides a pulldown
    21     switch = Button(btn, value_when_pressed=True)
    22
    23     while True:
    24         switch.update()
    25         if switch.pressed:
    26             led.value = not led.value # Toggle the LED
    27
    28
    29 main()
    

    Now a press of the joystick button toggles the LED on and off!

    CircuitPython Connect Oxocard Programming
    Share. Facebook Twitter Pinterest LinkedIn Tumblr Email
    PrimeHub
    • Website

    Related Posts

    DIY

    The Best Pool Vacuums – Tested by Bob Vila

    June 27, 2026
    DIY

    Move Beyond the Rainbow With These LED Color Tips

    June 24, 2026
    DIY

    How to Get Rid of Chiggers and Stop Itchy Skin for Good

    June 23, 2026
    DIY

    Top Ten Projects My Dad Would Like

    June 20, 2026
    DIY

    The Best Well Water Filtration Systems, Picks by Our Editors

    June 19, 2026
    DIY

    Maker Faire Prague 2026…Makes A Difference

    June 12, 2026
    Add A Comment
    Leave A Reply Cancel Reply

    Subscribe to News

    Get the latest sports news from NewsSite about world, sports and politics.

    Editor's Picks

    The Most-Saved Recipes in the Epicurious App in June

    June 27, 2026

    The Travel Hack That Saved Me Hours in Europe –

    June 27, 2026

    The Best Pool Vacuums – Tested by Bob Vila

    June 27, 2026

    Why Velux Fixed Skylights Are a Smart Choice for Any Property

    June 27, 2026
    Latest Posts

    20 Best Hotels in Tulum, From Luxury Resorts to Beach Bungalows

    August 24, 2025

    Things I Love at the Library

    August 24, 2025

    How to Test for Mold (Even If You Can’t See It)

    August 24, 2025
    Facebook Pinterest WhatsApp Instagram

    News

    • DIY
    • Eco Living
    • Finance
    • Food
    • Health

    catrgories

    • Lifestyle
    • Tech
    • Travel
    • DIY
    • Eco Living

    useful link

    • About Us
    • Contact us
    • Disclaimer
    • Privacy Policy
    • Terms and Conditions

    Subscribe to Updates

    Get the latest creative news from FooBar about art, design and business.

    © 2026 primehub.blog. Designed by Pro.
    • About Us
    • Contact us
    • Disclaimer
    • Privacy Policy

    Type above and press Enter to search. Press Esc to cancel.