


Before You Begin
Always think of personal safety first. Though unlikely, it is possible for a mower blade to start unexpectedly if you happen to turn the blade forcefully while you’re working on it, especially if it’s an older mower. As a precaution, it’s always a good idea to disconnect the spark plug to prevent accidental starts before you start working on the mower. If you’re working on an electric lawn mower, either unplug the power cord or remove the battery before beginning work.
Winterizing a Gas Lawn Mower
Step 1: Empty the gas tank or stabilize the fuel.
Many people don’t realize that over time, gasoline actually goes bad. The normal usable life of fuel is three to six months. As it ages, gasoline releases gummy substances that can clog the carburetor, exhaust port, and muffler and produces peroxides that attack rubber seals. To prevent this from happening, you need to empty your mower’s gas tank or stabilize the fuel prior to storing it for the winter.
Drain the tank
There are two ways to drain fuel out of the gas tank.
- Siphon it out. Purchase a siphon hose and pump (you can find them for about $10 online). Place one end of the siphon hose in the gas tank, making sure it’s submerged in the gas, and the other end in a container. Squeeze the pump repeatedly until all of the gas has been moved from the tank to the container.
- Disconnect the carburetor. Locate the small rubber hose that runs from the gas tank to the carburetor. Holding a container under the hose, disconnect that hose from the carburetor, allow the gasoline to drain into the container, then reconnect the hose.
Stabilize the fuel
A more economical and ecologically friendly alternative to draining your mower’s fuel tank and disposing of the leftover fuel is to conserve it in your mower’s gas tank by stabilizing it with a chemical stabilizer, such as STA-BIL Storage Fuel Stabilizer:
- Add stabilizer. Consult the fuel stabilizer’s label and add the right amount based on the size of the mower’s fuel tank.
- Top off the tank. Top off the fuel tank so it’s fuel. This step is key to prevent condensation from forming inside the tank while the mower’s in storage.
- Run the mower. Start up the lawn mower engine and let it run for 5 to 10 minutes to allow the stabilizer to run through the entire engine.
- Store your mower. Stabilized fuel lasts at least 12 months and up to 24 depending on the product.
Step 2: Change the oil.
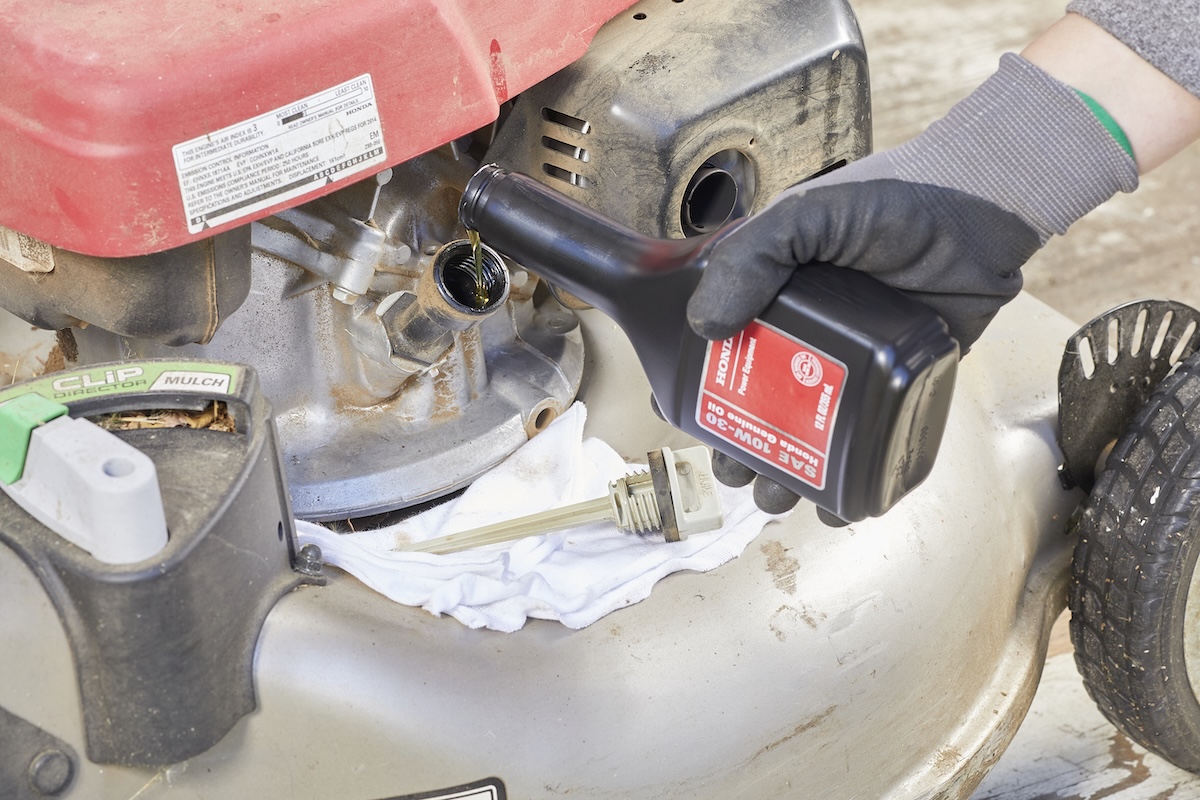
Motor oil is a surprisingly complex product able to withstand extremes of temperature and pressure. However, while cooling and protecting the motor, it collects tiny particles of debris. As these particles build up they can start to cause wear, so the oil needs to be changed periodically.
If you have a two-stroke lawn mower, lubricating oil is mixed with the gasoline and burns along with it, so this step isn’t necessary. If you have a larger four-stroke mower, the motor will have a separate oil tank. Before changing lawn mower oil, check the mower’s maintenance manual to see if oil changes are required. Some mowers, including select models from such lawn mower brands as Troy-Bilt, Craftsman, Toro, and Husqvarna, never require an oil change. In that case, simply check the oil level and add oil as needed.
If your mower does require an oil change, changing it is a simple process:
- Tilt the mower on its side. A push-behind lawn mower doesn’t have a bolt you can remove to drain the oil out of the engine as a car does, so you’ll need to empty the oil out of the same place where you add it. Start by tilting the mower on its side.
For riding lawn mowers, use a ramp to elevate it so you can access the underside of the engine.
- Drain the oil. Look for a black or yellow cap on the top of the engine with the word “oil” printed on it and position your drain pan under this cap. Open the cap to drain the oil into the pan. Once all the oil has drained out, place the mower back onto its four wheels.
If you have a riding mower, locate the bolt at the bottom of the engine. Loosen and remove the bolt using a socket wrench to drain the oil.
Remember that motor oil is hazardous waste, so dispose of the waste responsibly.
If you have a riding mower, you’ll also need to remove the oil filter, which is a cylindrical shaped metal object about the size of a small can that’s usually located on the side of the engine. Loosen the old filter using a filter wrench to turn it counterclockwise. Once loose, unscrew it by hand to remove it. Replace it with a new oil filter that’s compatible with your riding mower.
Pro tip: Draining the oil out of the lawn mower works best when the engine is warm.
- Add oil. Check the mower owner’s manual to determine the grade of oil and how much to add. Using a funnel, refill the oil then replace the engine oil cap.
Step 3: Change the fuel filter.
Fuel filters are small, cylindrical objects often made of white plastic. They fit in the fuel line between the gas tank and carburetor, and they remove small particles of dirt from gasoline. Over time, this collected debris can restrict flow and begin to starve the motor of gas, which is why it’s important to replace them. Note that not all walk behind lawn mowers have an in line fuel filter. Some have fuel filters built into the fuel tank that are not serviceable.
How to change a fuel filter on a lawn mower
- Locate the fuel filter. The fuel filter is located on the gas line that runs between the gas tank and the carburetor. Shut off the fuel by closing the valve at the base of the fuel tank. If there is no valve, clamp the gas line to prevent the fuel from running out when you disconnect the lines.
- Remove the fuel filter. Use a pair of needle nose pliers to remove the clips holding the lines to the fuel filter and remove the filter.
- Install the new fuel filter. Install the new fuel filter, making sure the direction of flow arrow on the filter points toward the carburetor. Make sure to reinstall the metal clips. Lastly, check for leaks.
Step 4: Sharpen the blade.
Before putting that mower up for the winter, make sure it’s ready when it’s time for your first mowing of the spring by sharpening the mower blade.
A dull blade might seem to cut, but it actually mashes the grass fibers. This damage hampers growth, makes the grass susceptible to diseases and causes patches of unsightly brown grass. A sharp blade cuts cleanly and helps keep the lawn healthy.
Sharpening can either be done with the blade on or off of the mower. A simple hand file can be used, but rotary tools with a grinding accessory are also popular. If you are sharpening on the mower, tilt it on its side rather than upside down, so metal filings don’t fall into the shaft that drives the blade.
Step 5: Clean the deck.
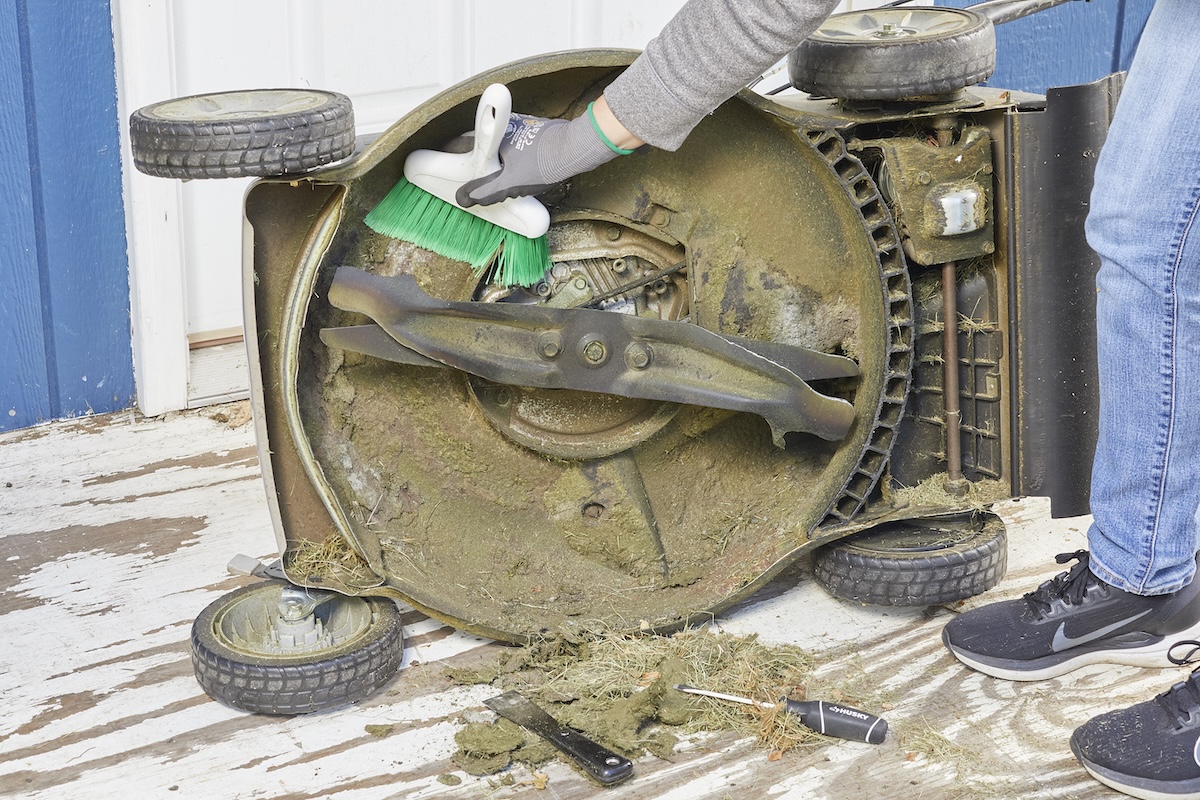
The best policy is to clean the deck of a lawn mower every time it is used. It’s much easier to remove damp material than stuck-on, dried grass or dirt. If the deck is made of metal, cleaning prevents moisture from attacking the finish and starting corrosion.
Winterizing a push mower is a good opportunity to give the deck a thorough clean and check for damage.
Step 1: Lean the mower on its side, making sure it is stable and can’t tip over. Use wheel ramps with riding lawn mowers, and chock the wheels.
Step 2: Use a pressure washer to remove grass and other debris from the underside of the mowing deck. If you don’t own a pressure washer, you can use a garden hose with an all-purpose cleaner and a stiff nylon brush to clean the deck.
Step 6: Clean and lubricate moving parts.
There are two aspects to cleaning and lubricating the moving parts. Your owner’s manual may have lubrication advice, which should always be followed in order to extend the life of your machine.
Mowers have a variety of places in which dirt can get trapped, causing damage and the start of corrosion. Wheels and axles are typical locations. Levers that adjust speed or raise and lower the deck height are another area. If the handle folds for storage, there’s a link that can trap grit. These may not be major problems, but over time they start to stick or grate and become a nuisance.
Clean thoroughly first, then apply a small amount of light machine oil, such as A 3-in-ONE multi-purpose oil. Silicone sprays like WD-40 are great for loosening tight nuts and bolts, but aren’t the best lubricant for this application because they go sticky and can trap dirt.
Step 7: Check cables.
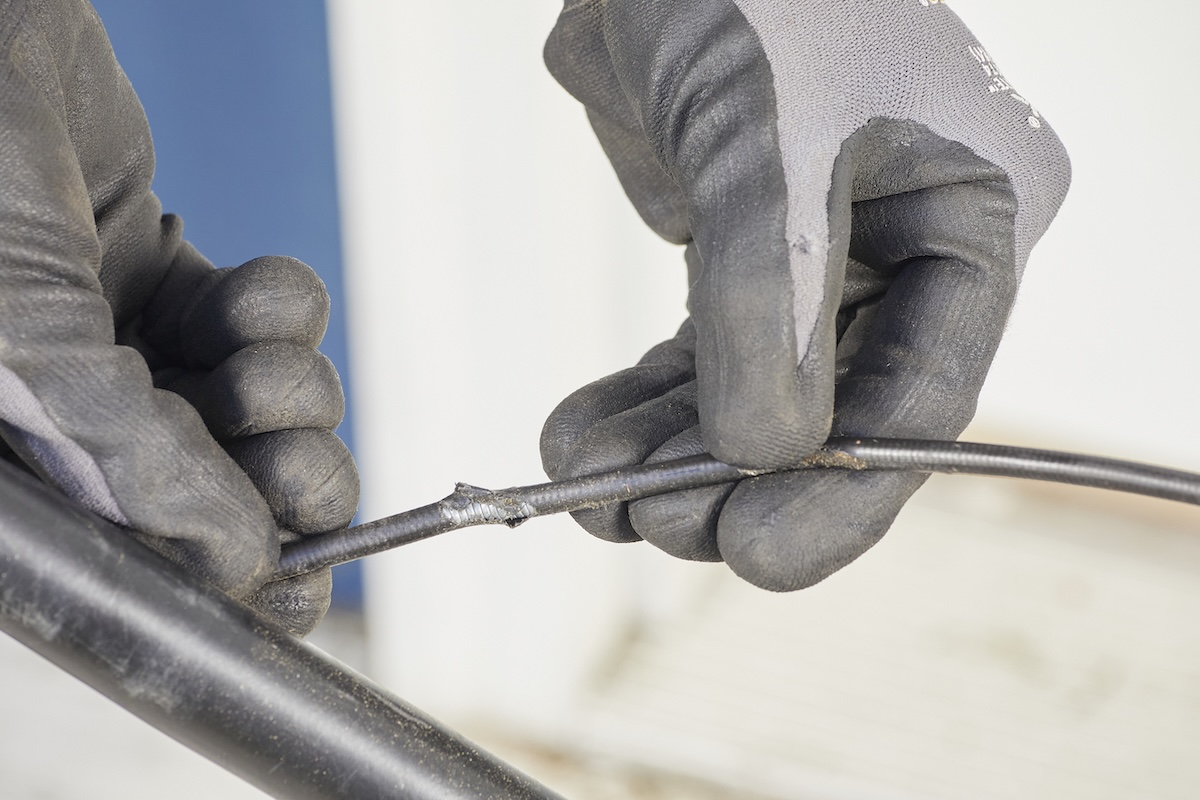
Throttle cables can get kinked and worn. There are usually guides that they rub against. Eventually they can rub through the protective coating and rust will start. If the guide is worn, replace it. It’s a quick and easy job and costs very little. If the throttle cable has started to fray, that should also be changed, because when the thin wires that make up the cable come loose, they will invariably stab you in a finger. Not a serious injury, but definitely not pleasant.
On electric mowers, carefully check the cable outer for any sign of damage. If there are cracks or splits, it should be changed. Exposed wires can cause short circuits that might trip breakers or prevent the lawn mower from working. There’s also a real danger of electric shock that could prove fatal. As a safety precaution, all electric garden equipment should be plugged into an outlet with a GFCI (Ground Fault Circuit Interrupter) fitted to prevent this.
Step 8: If there’s a battery, remove it and store it indoors.
The final task that will winterize a riding mower or a cordless model is to remove the battery. There are two reasons for this.
First, both standard 12-volt vehicle batteries and lithium-ion types gradually drain if left connected. Second, cold weather saps the power from them, so batteries need to be kept at a temperature above 40 degrees Fahrenheit. If you store your lawn mower somewhere that drops to freezing, the battery ought to be kept elsewhere.
With 12-volt models, it’s a good idea to leave them on a trickle (or maintenance) charge. Most modern battery chargers will do this without causing damage. Lithium-ion batteries are best stored with a charge of around 40 to 50 percent. This can be difficult to judge, but many have charge indicators.
While winterizing the lawn mower, it may be time to think about how to store grass boxes during the winter. Canvas models make a great winter home for rodents (which will probably chew them to pieces), and snakes, so it’s a good idea to store them where wildlife can’t get to them.
Winterizing Electric Lawn Mowers

While electric mowers don’t need nearly the same amount of winterizing maintenance as gas powered lawn mowers, they still need some attention before you store them for the winter.
Step 1: Unlike a gas lawn mower, you can’t use a power washer or garden hose with a sprayer to clean the underside of the mower deck. Doing so can force water into electrical components, causing a short. Instead clean the mower by removing any stuck on grass or dirt debris using a plastic scraper and by wiping it down with a damp cloth. To make cleaning the deck easier, apply an anti-stick treatment to the deck like Stens Mo-Deck Spray to make it easier to wipe down post mowing.
Step 2: Remove the battery, charge it to full, then store it in a cool, dry place where temperatures never drop below 40 degrees or rise above 80 degrees. Exposing batteries to extreme temperatures can shorten their lifespan.
Storing a Lawn Mower
If possible, always store your lawn mower in a dry location such as a garage or shed to protect it from the elements. If you must store it outside, cover it tightly with a waterproof tarp.

I Was Dead Set On Stone Floors—Until I Saw These Options