


Have you ever walked into a room and felt instantly lifted by the natural light streaming through? Are you tired of relying on artificial lighting during the day? What if you could transform a dark, gloomy space into a bright, welcoming haven with a single home improvement project?
Skylight installation on a tiled roof might sound like a daunting task, but it’s more achievable than you’d think. Whether you’re a confident DIYer or simply want to understand the process before hiring a professional, this guide will walk you through everything you need to know. From understanding tile compatibility to weatherproofing your new skylight, we’ve got you covered.
In this article, you’ll discover the step-by-step process for installing skylights on tiled roofs, learn about council approval requirements in Australia, and pick up practical tips to avoid common mistakes. By the end, you’ll have the knowledge to make informed decisions about bringing more natural light into your home.
What Is a Tiled Roof Skylight?
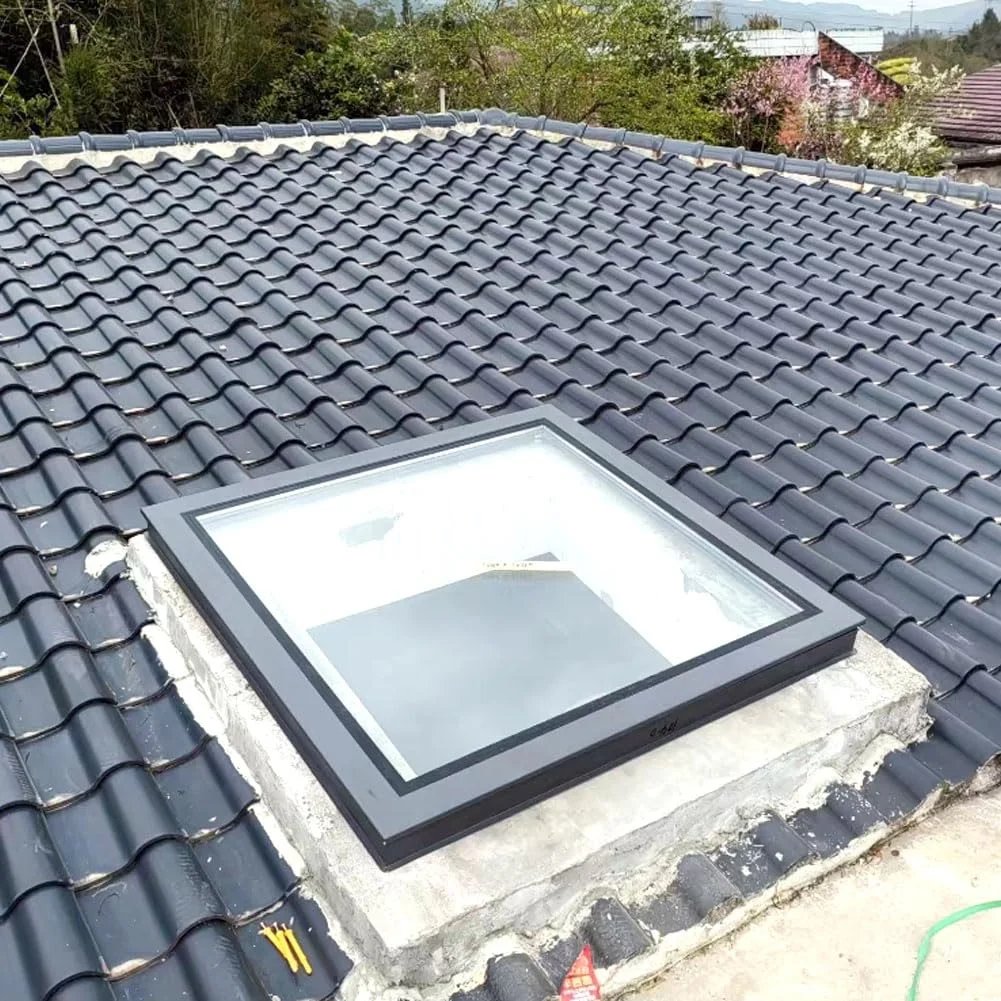
A tiled roof skylights are essentially a window installed into your roof, designed specifically to work with tiled roofing materials. These skylights come in various styles, each suited to different needs and preferences.
Types Of Skylights Suitable For Tiled Roofs
The most common options include fixed skylights, ventilated skylights, and tubular skylights. Fixed skylights are sealed units that let light in without opening. Ventilated models can be opened manually or electronically, allowing fresh air circulation. Tubular skylights use reflective tubes to channel light into smaller spaces like hallways or bathrooms.
Fixed vs Ventilated Skylights: Which Is Right for You?
If your main goal is simply adding light, a fixed skylight is cost-effective and requires less maintenance. However, if you want to improve airflow and reduce reliance on air conditioning during Australia’s warmer months, a ventilated skylight is worth the extra investment. Consider your room’s purpose and climate when making this decision.
Can You Install a Skylight on a Tiled Roof?
Absolutely! Tiled roofs are actually well-suited for skylight installation, though there are a few factors to consider first.
Understanding Roof Pitch and Tile Compatibility
Most skylights work best on roofs with a pitch between 15 and 85 degrees. Your roof’s angle affects how water drains around the skylight, so getting this right is crucial for preventing leaks. Check your skylight manufacturer’s specifications to confirm compatibility with your roof pitch.
Common Tile Types and Installation Considerations
Concrete and terracotta tiles are the most common in Australian homes, and both work well with skylights. The key is using the correct flashing kit designed for your specific tile profile. Flat tiles require different flashing than profiled or interlocking tiles, so make sure you’ve got the right components before starting.
Planning Your Skylight Installation
Proper planning is half the battle when it comes to successful skylight installation. Rushing this stage often leads to costly mistakes down the track.
How to Choose the Right Location
Think about where you want the light to land throughout the day. South-facing skylights provide consistent, diffused light, while north-facing ones deliver more direct sunlight and warmth. Avoid positioning skylights where trees might drop leaves or debris onto them.
What Size Skylight Do I Need?
As a general rule, your skylight should be about 5% of the floor area for rooms with existing windows, or 15% for rooms without. For a 20-square-metre bedroom, that translates to roughly a 1-square-metre skylight.
Checking for Structural Obstacles
Before cutting into your roof, locate any rafters, trusses, electrical wiring, or plumbing that might be in the way. Use a stud finder and check from both the interior and roof cavity. Repositioning your skylight slightly is far easier than dealing with structural issues mid-installation.
Having the right gear ready before you start will make the process much smoother.
Essential Tools for DIY Installation
You’ll need a reciprocating saw or circular saw for cutting the roof opening, a drill with various bits, a tape measure, chalk line, spirit level, and safety equipment including goggles, gloves, and a safety harness. A helper on the ground is also invaluable for passing tools and materials.
Skylight Flashing Kits and Weatherproofing Supplies
Every skylight needs a proper flashing kit designed for your tile type. You’ll also need roofing sealant, waterproof membrane, and potentially some replacement tiles if existing ones crack during removal. Quality weatherproofing materials are essential—this isn’t the place to cut corners.
Step-by-Step Guide to Installing a Skylight on a Tiled Roof
Now for the exciting part. Here’s how to tackle the skylight installation process from start to finish.
Step 1: Marking and Measuring the Opening
From inside the roof cavity, mark the corners of your opening by driving nails through the roof. On the roof exterior, connect these points using a chalk line. Double-check your measurements—measure twice, cut once.
Step 2: Removing Roof Tiles Safely
Carefully lift and remove tiles around your marked area, working from top to bottom. Store tiles safely as you’ll need them later. Take your time here to avoid cracking tiles unnecessarily.
Step 3: Cutting the Roof Opening
Cut through the roofing underlay and battens using your reciprocating saw. If you need to cut through rafters, install headers and trimmers first to maintain structural integrity. Always work on a dry day to prevent moisture entering your roof cavity.
Step 4: Installing the Skylight Frame
Position the skylight frame in the opening and check it’s level. Secure it to the surrounding rafters according to the manufacturer’s instructions, ensuring it’s square and properly aligned.
Step 5: Fitting the Flashing Kit
Install the bottom flashing first, then the side flashings, and finally the top flashing. Each piece should overlap correctly to channel water away from the skylight. This is where many DIYers go wrong, so follow the instructions meticulously.
Step 6: Securing the Skylight and Replacing Tiles
With the flashing in place, install the skylight glazing unit. Then carefully replace the tiles around the flashing, cutting tiles as needed to fit snugly against the skylight frame.
Step 7: Sealing and Weatherproofing
Apply roofing sealant around all flashing edges and joints. Check for any gaps where water could penetrate. A thorough seal now prevents headaches later.
Do I Need Council Approval in Australia?
This depends on where you live and the scope of your project.
Building Regulations and Permit Requirements
In most Australian states, skylight installation is considered exempt development if it doesn’t alter the roof structure significantly. However, if you’re cutting through rafters or trusses, you’ll likely need approval. Heritage-listed properties also have additional requirements.
When to Consult a Licensed Professional
If your project requires structural modifications, or if you’re unsure about regulations in your area, consult a licensed builder or your local council. Getting proper approval protects you legally and ensures your home insurance remains valid.
How Much Does Skylight Installation Cost?
Budget considerations play a big role in deciding between DIY and professional installation.
Factors That Affect Pricing
Skylight prices range from $300 for basic fixed models to over $2,000 for premium ventilated units. Installation costs vary based on roof accessibility, tile type, and whether structural work is needed. Flashing kits add another $150-$400.
DIY vs Professional Installation
A professional skylight installation typically costs between $800 and $2,500 for labour. DIY can save you this expense, but factor in tool hire and the value of your time. Plus, professionals offer warranties on their workmanship—something you can’t get doing it yourself.
Common Mistakes to Avoid
Learning from others’ errors can save you significant grief.
How to Prevent Leaks
Leaks are the number one complaint with skylights, usually caused by improper flashing installation. Always use manufacturer-approved flashing kits, install components in the correct order, and don’t skimp on sealant. Test with a hose before calling the job done.
Ensuring Proper Insulation and Ventilation
Poor insulation around your skylight shaft causes condensation and heat loss. Line the shaft with insulation batts and install a vapour barrier. Adequate ventilation in the roof cavity also prevents moisture buildup.
How Long Does Installation Take?
For a straightforward skylight installation without structural modifications, experienced DIYers can complete the job in one to two days. Professional installers often finish within four to six hours. Allow extra time if you’re working alone or tackling your first skylight project.
Maintaining Your Skylight
A little ongoing care keeps your skylight performing beautifully for years.
Clean the glass inside and out every few months using a soft cloth and mild detergent. Inspect seals and flashing annually, especially before the wet season. Look out for condensation between glazing layers, cracks in seals, or water stains on your ceiling—these signal repair is needed.
Installing Tiled Roof Skylights is a rewarding project that transforms your living space with natural light and improved ventilation. While it requires careful planning and attention to detail, the results are absolutely worth the effort.
The key to success lies in thorough preparation, using quality materials, and not rushing the weatherproofing stage. Whether you tackle this project yourself or hire a professional, understanding the process helps you make better decisions and achieve a result you’ll enjoy for decades.
So, are you ready to brighten up your home? With this guide in hand, you’ve got everything you need to get started on your skylight installation journey. Good luck, and here’s to lighter, brighter days ahead!
